Showing posts with label green. Show all posts

Saturday, February 4, 2012

Stash Busting- Nesting Balls Tutorial


In my attempt to make the King Quilt, I have been producing a ton of tiny little scraps of fabric and bits of thread. I knew they could be useful for something, so I have been piling them on the kitchen table as I cut and sew. You can see the beginning of the pile in the first picture on this post. 

When I finally went to clean the table off today, a small child could have hidden in the scrap pile.

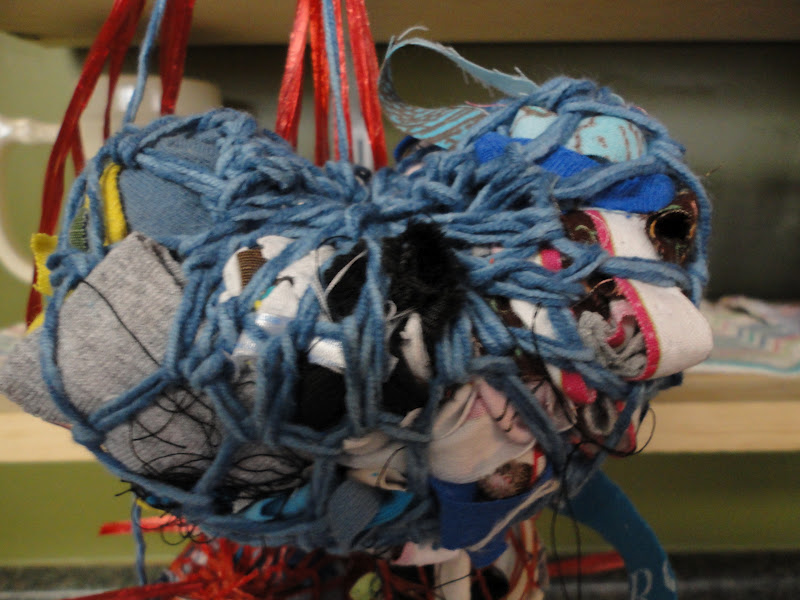
I also cleaned underneath the kitchen sink today and discovered an old mesh potato bag. Yup, there was a light bulb moment. I remembered seeing somewhere that someone had stuffed a bunch of scraps and what not into a mesh bag and hung it up for the birds to use as nesting material. I don't really know if there is a proper name for these things, but I have been calling them nesting balls.

So, here is how I made them.


Materials:
Scissors
Crochet hook, safety pin, or large eyed needle
Yarn, ribbon, twine, rope, etc.
Potato or similar bag
Lots of fabric, yarn, and thread scraps


Step 1.  Cut the potato bag open so it makes a rectangle of "fabric." (Taking pictures was kinda an after thought, so I don't have the full bag). Cut the bag down to rectangles or squares . Mine were about 6" x 4", but play around till you find a size that works for you. 
*Quick tip: Squares will make circle balls, while rectangles will make more of a heart shape.*

Step 2. Weave a length of yarn through the holes all the way around one square of fabric. I used a crochet hook, but a safety pin or needle will work also. Really, if you are patient enough, you could probably do the weaving with just your hands. I am not. The crochet hook makes it go quickly. 

Step 3. Once you are all the way around, cut the yarn leaving a really long tail. Next, make a loop (I used a slip knot) leaving a bit of a tail. Next, slide the long tail through your loop. I suck at taking pictures of the steps. 

 Step 4. Pull the long tail so that the bag starts to tighten up a bit. 

Step 5. Start Stuffing! Keep going until you feel that you have an adequate amount of scraps in the ball. 


Step 6. Pull the long tail of yarn until the ball is all scrunched up tight. Tie a knot using the little tail from the loop. Now, wait anxiously for Spring so that you can hang these up for the birdies! 


I ran out of potato bag long before I ran out of scarps. So, out came my vinyl record bowl of leftover yarn bowls and my gigantic crochet hook (I think it's a Q), and I whipped up a few rectangles. Yeah, I probably could have just crocheted a ball...


but really, a rectangle is way quicker and I love that they look like hearts.
I hope winter is treating you well! 

Thanks for stopping by. If you have any questions at all, just let me know.


Sunday, May 15, 2011

A Picture is Worth a Thousand Words, so is a Dictionary.

I have been wanting to get my hands on an old  for a while now.  I mean, how cool would it be to craft using pages from an old dictionary? I had envisioned cool inchies and ATC's, plus some other mixed media types of things. 

I purchased this old guy from the Friends of the Library book sale in my town. I paid a whopping $0.50 for this. 
G. & C. Merriam Co., Publishers
 Springfield, MASS., U.S.A.
1943

I am really glad I got it. I was flipping through it the other day looking at the pictures and thinking of all the fun inchies I could make from those alone. 

As I was wondering through the world wide web one day, I came upon a couple pretty cool pictures that had been printed right onto pages from old books. You can see one here.

A few days went buy and I kept thinking about the picture. 

Then I signed up for and received my partner for the Tree Swap at Craftsters.org. 


I didn't immediately put the two together, but once I did, "Hello new obsession!" 

Here are a few of the trees I have drawn in the last 2 days (it could be 3, I can't remember exactly).

The bird in this tree is the actual picture from the dictionary that goes with the word 'warbler'

I was attempting to draw birch trees, but they didn't really come out. When I asked Jared what kind of trees he thought they where, his reply was, "Dictionary trees?"

Not a favorite. I was trying to draw a weeping willow but I only have a vague idea of what they look like. Might have to do a research trip soon. 

These next four are a series. I actually started with the Summer one, they realized I liked it a lot. Once I added the nest, I loved the idea of seeing the nest in different seasons. 

Spring
Can you see the eggs?

Summer
Can you see the baby birds (there are 3)?
I drew the brown lines with my sharpie, but then lost it. I would prefer that they all have the same color brown, but I don't expect I will be able to wait much longer for the marker to turn up. 

Fall
Kinda hard to miss the birds in this one.

Winter
Bye bye Birdies!

Well, I think I might go look at some trees on the web and see what else I can come up with. I hope you have a great week!

Saturday, April 16, 2011

Meet Amphibalinna

I have been spending all my time over at craftster.org lately. I have been swapping crafty goodies like crazy. I think I am addicted. 

In the last 2 months I have tried a few new crafts and gotten hooked on owls: 
Inchies- 1" x 1" pieces of art work. Think about the size of a quarter, only square. 
ATC's - Artist Trading Cards- Same size as baseball/football/etc cards. 
Owls- These will require their own post :)

My most exciting new item though is Amphibalinna.


Linna to her friends. 

Linna is a poppet. I discovered the world of poppets through, you guessed it, Craftsters! Here is a fun link with lots of poppet pictures.

Linna began her life as this:

A few cuts, a little thread, and the beginnings of Amphibalinna!


The instructions called for some sort of button shank thingy. I didn't have the time, energy, or money to go to the store to get what was recommended. I dug through my bag of buttons looking for buttons that might work. The buttons are so that the arms and legs can move. 

After attaching the arms and legs.

Her cute tail.
I was doing some detail work on the toes when Emma snatched this photo.

Making her clothes was a bigger pain in the butt then making her. The clothes, made from fabric scraps, turned out kinda crappy, but Linna's cuteness makes up for it. 


Her eyes are made from buttons, her hair is wool roving. Because her body is from wool, I was able to needle felt her hair right on. Might not be the best way to do it, but I thought it worked out nicely. 

A bit of Linna's personality has started to show through. She is an animal lover. She loves,
Cats

Dogs

Ponies

and dino's.

Her favorite cuddle buddy though is
Emma.

Thanks for stopping by!