Showing posts with label scrap. Show all posts

Sunday, May 12, 2013

Birthday Tracker

I suck at remembering to call people on birthday's and anniversaries. I would like to do better.

So, I crafted about it.

Birthday Tracker (3)

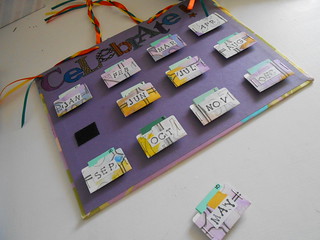
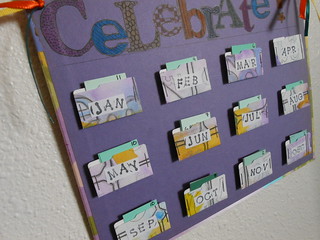
Using a bunch of stuff I had lying around, I made up this birthday and anniversary tracker. For the heck of it, I'll bore you all with the what and how of it. 

Birthday Tracker (9)
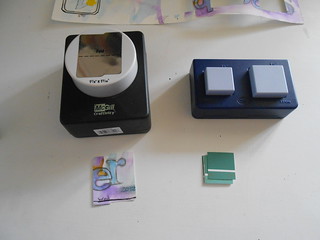
Some of the tools I used

What I used:

An old hardcover book (just need either the front or the back)
Old scratch paper (I used a watercolor painting that didn't work out)
Paint Chips
Sticky back Velcro
Ribbon
Scrap Sticker Paper

The tools that I used where:
Mini folder punch
Scissors
Square punch
Stapler
Alphabet Stamps
Ink

All I did was punch out 12 mini folders from the scratch paper, and a ton of small squares from the paint chips. 

Birthday Tracker (10)

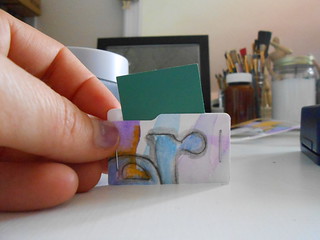
Fold the mini folders and staple.

Birthday Tracker

I used the scraps of sticker paper to make sure that the stamped months show up better. 

Birthday Tracker (6)

For the information, I just put the date of the event in the upper right hand corner, the name of the person in the middle, and the year of the event on the bottom (like how I hid the info?). On the back of the square I wrote the address.

On the back of the mini folder, I attached the Velcro, then stuck the other piece onto the old book cover. I punched a few wholes, braided some ribbon, threaded it through, and hung it up. 

Why do all this? 

So that at the beginning of the month, I can sit down at my desk,

Birthday Tracker (5)

pull off the current month, and send out birthday or anniversary cards, letters or postcards. 

Well, that's the plan anyway. We'll see how it all works out. 

Saturday, February 4, 2012

Stash Busting- Nesting Balls Tutorial


In my attempt to make the King Quilt, I have been producing a ton of tiny little scraps of fabric and bits of thread. I knew they could be useful for something, so I have been piling them on the kitchen table as I cut and sew. You can see the beginning of the pile in the first picture on this post. 

When I finally went to clean the table off today, a small child could have hidden in the scrap pile.

I also cleaned underneath the kitchen sink today and discovered an old mesh potato bag. Yup, there was a light bulb moment. I remembered seeing somewhere that someone had stuffed a bunch of scraps and what not into a mesh bag and hung it up for the birds to use as nesting material. I don't really know if there is a proper name for these things, but I have been calling them nesting balls.

So, here is how I made them.


Materials:
Scissors
Crochet hook, safety pin, or large eyed needle
Yarn, ribbon, twine, rope, etc.
Potato or similar bag
Lots of fabric, yarn, and thread scraps


Step 1.  Cut the potato bag open so it makes a rectangle of "fabric." (Taking pictures was kinda an after thought, so I don't have the full bag). Cut the bag down to rectangles or squares . Mine were about 6" x 4", but play around till you find a size that works for you. 
*Quick tip: Squares will make circle balls, while rectangles will make more of a heart shape.*

Step 2. Weave a length of yarn through the holes all the way around one square of fabric. I used a crochet hook, but a safety pin or needle will work also. Really, if you are patient enough, you could probably do the weaving with just your hands. I am not. The crochet hook makes it go quickly. 

Step 3. Once you are all the way around, cut the yarn leaving a really long tail. Next, make a loop (I used a slip knot) leaving a bit of a tail. Next, slide the long tail through your loop. I suck at taking pictures of the steps. 

 Step 4. Pull the long tail so that the bag starts to tighten up a bit. 

Step 5. Start Stuffing! Keep going until you feel that you have an adequate amount of scraps in the ball. 


Step 6. Pull the long tail of yarn until the ball is all scrunched up tight. Tie a knot using the little tail from the loop. Now, wait anxiously for Spring so that you can hang these up for the birdies! 


I ran out of potato bag long before I ran out of scarps. So, out came my vinyl record bowl of leftover yarn bowls and my gigantic crochet hook (I think it's a Q), and I whipped up a few rectangles. Yeah, I probably could have just crocheted a ball...


but really, a rectangle is way quicker and I love that they look like hearts.

I hope winter is treating you well! 

Thanks for stopping by. If you have any questions at all, just let me know.


Sunday, July 24, 2011

Still In Love

Oh boy. I think I may end up need an entire room for all the paper people I have running through my head!

I spent more time today sketching figures than actually putting them together, but I still had a blast. Especially because if you had told me 2 months ago that I would be drawing people (not just stick people) and that they would actually resemble people (if a bit whimsical), I would have laughed. Hard.

So, long story short, I am enjoying drawing the figures as much as I am enjoying creating the finished person.

So, without more "Wah wah, wah" (you know, the noise that the adults make in the Peanuts movies);

Meet Lolyta. 
I love her. 
She makes me smile when I look at her :)


Here is Lolyta with her sketch. 
Her sketch is referred to as #8 (cause, well, she was the 8th sketch I made). 

Close up of Lolyta's skirt. You can just see her cute little shoes peaking out. 

More sketches. Actually, the rest of the pictures are sketches. I used a magazine lady as the inspiration for the pose on the left. Then I wanted to see if I could draw a man. Turns out I can :)

I REALLY want to make a cowgirl for Emma. I thought that if I could also make her a cowgirl that could sit on a horse (either drawn or cut from a book/magazine)

Sketch on the left is taken from a magazine ad with Beyonce. The right is a sketch from my imagination. Amazing isn't it :) That is also Miss Lolyta!

I have vision of including my paper people in my altered art journals as well as trying to make them into cards or little pieces of art that I can submit to our local ArtVend (an awesome vending machine with small pieces of local art in it). In order to do that I needed them to be smaller then the 9" ladies I have been making. So, I played with dimensions. 
I ended up having to switch to graph paper at one point to get it figured out. But it worked! This sketch is just over 6 inches, about 2 inches wide. Perfect for oh so many things :)


I am loosely following along with the Altered Journal Craft Along on craftsters.org and the theme right now is sunshine, light, and music. I had the image of a kid blowing bubbles in the sunshine, wearing a fun summer dress with some birds singing in the background. The above sketch is the pose that came to mind. Not exactly a kids body, but it will be. 

Then I thought, "Well, she could be blowing someone a kiss. But if she were, she would be in a more romantic, dramatic pose." Yeah, might take a bit of imagination to see it, but hey, I WAS ABLE TO SKETCH THIS WITHOUT THE LINES!!! 

Yes, a bit over excited, but I like the idea of being able to just whip out a sketch without having to draw all the silly measurement lines :)

I hope you had a fantastic Sunday and I hope that your week goes even better!

p.s. We decided to name the tall girl (the one on my MIL's wall) Celeste. My very first paper girly is named Sophie. And I love them all :)

Wednesday, June 22, 2011

Tutorial- My version of an Art Journal

(Wow, 2 posts in 2 days!)

Ok, so if you are not aware of my latest obsession, you may want to read up a bit here.

So, now it is my job to get you hooked as well :)

Here we go!

Materials Needed:
-Corrugated cardboard
-Ruler
-Rotary cutter (or scissors)
-Cutting mat (if using rotary cutter)
-Book rings (or ribbon will work as well, just a little more of a pain to add pages)
-Paper (printer paper, tracing paper, wrapping paper, newspaper, scrapbook paper, brown paper bags, packaging paper, graph paper, maps... I think you get the idea)
-Hole Punch (not shown- adjustable 3 hole punch or a single punch. You may be able to get a fixed 3 hole punch to work)
-Other fun and random items to to put into your journal. (envelopes, cards, pictures, fabric, dried flowers, beads, trinkets, whatever!)
-Writing implements.
-Glue, tape, stapler, staples.

Oh, and  box. I like to find a shoe box (or a papa johns chicken strips box in this case) to hold all the items that I think I might want to add to my journal. I usually try to keep at least a glue stick in there also.


Step 1.
-Decide what size you want your journal to be. I typically like 5.5 inches by 5.5 inches. Having it a square makes it a bit easier to get the pages lined up.

However, for this black and white journal I went with what I had for white paper which ended up being 4 inches by 6 inches.

-Cut 2 pieces of cardboard slightly larger on 3 sides then your paper.
-Cut a lot of random paper to to the size you would like. You do not need to get them perfect.

Step 2.
-Set up your adjustable 3 hole punch so that 2 of the punches are where you would like your rings or ribbons. I suppose you could also have 3 holes. Or 4 for that matter. How ever many you want :)
-Punch holes on one side of all of your paper and the cardboard. *Make sure that the paper is pushed all the way to the back of the hole punch (or you will get partially punched holes). It may make it easier if you make a mark on the hole punch so you know where to like all you paper up so that the holes line up nicely.


Or not, it is up to you :) the beauty of the book rings or ribbon is that as long as the holes mostly line up, you should be good to go.


Step 3.
-Here is where the fun comes in. Take your cardboard and poke a pencil under the top layer of paper.


Peal it off slowly until your get the look you are going for. Do one side of each piece of cardboard.


Step 4
Sew things to other things :) This is of course an optional step, but I really like this part, so I expect that all of my covers will have some sewing on them.  Not super happy with the back cover but I can fix it as I go.

-If you plan to add anything that will hang off or add any odd bulk, wait until your are about finished with your journal. Or add it now and take out the pages you want to work as you go :)

Step 4.
-Ok this part is pretty fun too. Put everything together. Play with the lay out. Then do what you will with it :) Draw, paint, collage, staple and have a blast!


Don't mind the green ring. I just ordered more silver, but I had to make do :)

Here are a few examples of what I have done with my journal so far.


Bits of left over thread from the covers.
Envelope holding a sticker to be added.


Stamped paint chip weaving. 
Months of the year. Just 'cause. 


We really love horses :)

If you have any questions, or need something clarified, please leave me a message or send me an e-mail. I am happy to help!

I would love to see what you make. If you write a blog post about it, leave me a comment with the link and I will stop by and check it out!

Happy Crafting!


p.s. I plan to add photos of my pages as I add to the journal. Thanks for stopping by!
Tuesday, June 21, 2011

Latest Obsession

Ok, so I had a blast at my first vending event. Thank you very much to everyone out at Prairieland Herb for making my first event awesome and stress free!

Lets hope my first class goes as smoothly :)

Ok, so onto my latest obsession.


Art Journals!

Well, I guess mine would qualify more as junk or scrap journals for a few reasons. 
1. I can't draw. I am working on it, but really, there are very few things that I can draw well enough that someone else would be able to recognize it easily. 
2. I am addicted to adding stuff to it. Basically, if I could figure out how to  punch 2 holes in the kitchen sink, I would probably try to add that too :)

I have been wanting to make an art journal for a while. The ones that I keep seeing over at craftster.org look so cool, and I love the idea of being able to recycle. Go figure. I am not sure when I first started coveting one, but it has been a while. 

Added to that, I have been researching other ways to make journals and such and I ran across this cool woven journal cover. Once I found that, I was stuck (believe me, my arm was really being twisted) reading through The Creative Place. For hours. I loved all the journals I found there and wanted to make them all. 

Through that site (I think), I found this cool technique for making covers. 

And the straw that broke the camels back was this awesome art journal made by Phizzychick. I finally felt ready. 

I guess in the true sense, an art journal is suppose to be a visual journal. You can still write in it, but a lot of it is drawings, paintings, etc. 

I can't really do either of those, and I kinda fell off the journalling bandwagon. I didn't let that stop me. I figure the only way I will learn to draw and paint is if I try, try, try again! Until I get better at it, I plan to just keep adding cool things to my journal :)

Inchie Tree and Random stuff.
Emma's Mud Gloves and Mud Socks
The green and purple paper is newspaper that I painted with acrylic paint. A lot of the inchies (1"x1" pieces or art) that I received in swaps are in here. 

Envelope received in a swap.
Dictionary page sent through the printer.


Panda card.
Zantangles. Thinking of a B&W theme.


ATC received in a swap
Handmade paper and a note


The beginnings of Emma's art work section.


Emma holding her pigtails while sleeping. 
Bowling in Tucson :)


Awesome inchies!
Close up of the awesome inchies. 


Happy mistake- Pen holder.
I can draw flowers. Apparently.


More Zentangles
Stitched owl on denim.


Emma's early art. 
Doodles


More flowers.
Collage with a few inchies.


Teddy Graham
More flowers


More flowers!!
Needle Felted Flower


Handmade paper. 
More of Emma's art.


Emma's very first drawing of a person.
Winking cowgirl or equestrienne. 


Chicken wire and wool yarn thingy. 
Doodle.


Tree doodle.
First attempt at bead drawing. 


Flowers with added backround.
Boarder work-in-progress.


Cool shoe tag I found on the ground. 


 I used note cards, envelopes, plastic packages, overhead projector paper, ribbon, etc. I plan to have a step-by-step how to up by Friday. 

I hope you are inspired!