Showing posts with label tutorial. Show all posts

Wednesday, August 29, 2012

Altered Journal Tutorial- Pick and Prepare

I am always amazed that inspiration and motivation can come from very unexpected places. This past Sunday- Tuesday, my hubby and I finally took what I would call a real vacation. We didn't go anywhere to visit anyone. The sole purpose of the trip was for the hubby to get some mountain bike riding in, and for me to get some quiet crafting time in.

We stayed at this WONDERFUL B&B called Whiteley Creek Homestead B&B, in Brainerd, MN. I chose this B&B for many reasons, but the biggest was that Adrienne, the owner, has a lot of fun craftiness posted on her blog. What better place to craft than a B&B run by a crafty woman?

Anyway, our wonderful trip is a topic for another day. The reason I bring it up at all is that Adrienne was very interested in my crafting, and once I showed her the journals I was working in, she made me glow with how much she loved and was inspired by my work. She really wanted to make a journal, but while the B&B is open (May-October) she really doesn't have a lot of time for being creative (though I can assure you, her breakfasts are a work of art!).

So I promised her I would post a tutorial on how to get an altered journal started. I have decided to do this as a series because I tend to write long winded posts- especially tutorials. That being said, here we go!

Picking a Book
#1- The first thing to think about after deciding to make an altered journal is the size. I usually have two journals going at the same time. I use a smaller journal for journaling everyday, and a larger journal for making a bigger mess.


My smaller journals is about 4"X6", so that gives me about an 8" spread (both the left and right hand pages together).
My larger journal is anywhere from 8"X10" on up. That gives me at least a 16" spread.

Once you know what size you want, run out to the thrift stores, garage sales, library sale shelf and buy a book! (or 9) We have a thrift depot place that I love where the books are $0.25. Perfect.


#2- Check the binding. Working with a book that has stitched signatures (groupings of pages) is SO much easier. This tutorial will talk about working with stitched books. I will try to write another post about different bindings (glued, spiral, etc) but no promises as the stitched is my favorite.

These two photos show you what a stitched book looks like. Sometimes the stitches can be hard to find, but it's worth the extra time it takes.


Stitching is broken= extra work.

Avoid books that look like this (although I will be writing a post on how to fix this if necessary during this series).

Once you have the book(s) you want, now its time to get the book ready!

Prepping a Book
#1- Grab your book and a comfy seat- we are going to start removing pages (note: a cement slab is NOT a comfy place to sit for this process).

Why remove pages? To give us more room for all the awesomeness we will put into the book! Every piece of paper or layer of paint that gets added to the book adds to the books thickness. Without removing any pages, your book wouldn't shut and the spine would bust. Believe me, removing pages is important.

Find the center of your first signature (picture 2a shows the center stitching)


Count how many pages are in each signature. This book had 14 (7 pages on each side of the center stitching). This will help with deciding the number of pages to remove. Page thickness plays a part as well.

For thin pages, remove less as you will need to glue more pages together in order to make a sturdy surfaces for all the awesomeness mentioned above. Books with thicker pages can stand to have more removed.

This book has pretty thick pages so I decided to pull 4 pages from each side (or 4 spreads).


With the book open so the center of the signature is visible, take the first page on each side of the stitching and close them, but keep your fingers between those two pages and the rest.


Starting at the top of the book, s-l-o-w-l-y rip the pages (or spread) from the book. There will be a slight resistance when you get to the stitching, but keep going slowly and the page will come out.

This is what your spread should look like once removed.


Not all of your pages will come out cleanly. If this happens...


...don't worry about it. Seriously it isn't a big deal.


Remove the rest of the desired pages from your first signature. Close the book and see how it looks. You will see a noticeable difference between the first signature and the rest. If for some reason you don't, maybe think about removing more pages, one spread at a time.

Repeat the process with the remaining signatures in the book.


Your book might now look like this. Keep that pile of removed pages!

After removing 4 spreads from each signature, this is about what my book looks like. I could probably go back and take one more spread from each signature, but I decided not too.


Now comes more fun!

#2- Gluing your pages together. This step gives us nice sturdy pages to work on. If the book you chose has nice thick pages you may be able to get away without gluing, but in most cases, you are better off gluing at least 2 pages together. For thinner pages, 3-5 pages together isn't a bad idea.


Gather your glue stick (or 2) and the pages you already removed from the book. I am still working out the best way to stick the pages together. Right now I like the Prang brand glue stick. Double sided tape will work, but if you draw on your pages, the tape will cause marks.

(four pages glued together- frayed edges)

I used to just glue pages together and call it good, but now I get bugged by the "frayed" edges and I always worry I am going to try to turn a page and rip some glued pages apart.

Enter the previously removed pages.


At the end of my last journal, I started using the removed pages as a wrap to finish off the edge of the glued pages.

Deciding how many pages to glue together can be tricky. If the paper is thin, start with 3 pages or more. If the paper is thicker, start with 2. Count out the number of pages you plan to glue together and wrap one of the removed spreads around them like the picture above implies. Go through the entire book.


You may be tempted to skip this step, but we warned- You could realize halfway through the book or farther that you miscalculated and you end up adding all the pages you removed, back into the book. When I went through this book with 2 pages wrapped in a spread (basically 2 pages), I had one spread left. There would have been little room left to add anything creative to the book.


So, I still went through and glued 2 pages together (sometimes 3 if I wasn't paying attention), and occasionally added one of the removed spreads as a wrap.


To glue- run your glue stick around all 4 edges of one page and an X from corner to corner. Press the other page against the page with glue and smooth it out with your hand.

If you want to add the removed pages as a wrap, simply repeat the glue process on the outside of the pages glued together and smooth the removed page, crease side out, over the page. Flip the glued pages over, lay some glue down again, fold the page over, and smooth it down. Below is a picture of what you will end up with.


Here is what the edge will look like.

Now all you need to do is repeat until you get through the book! Here is what my book looked like when I was finished.


That's it! You now have an altered journal to work in! My next post will explain my process for getting started with the actual creating/journaling. Check back soon!

If there are any questions or anything that is unclear, please don't hesitate to post a comment or e-mail me at kaotickrafter (at) hotmail (dot) com.

Thanks for stopping by and have a creative day!

Saturday, February 4, 2012

Stash Busting- Nesting Balls Tutorial


In my attempt to make the King Quilt, I have been producing a ton of tiny little scraps of fabric and bits of thread. I knew they could be useful for something, so I have been piling them on the kitchen table as I cut and sew. You can see the beginning of the pile in the first picture on this post

When I finally went to clean the table off today, a small child could have hidden in the scrap pile.

I also cleaned underneath the kitchen sink today and discovered an old mesh potato bag. Yup, there was a light bulb moment. I remembered seeing somewhere that someone had stuffed a bunch of scraps and what not into a mesh bag and hung it up for the birds to use as nesting material. I don't really know if there is a proper name for these things, but I have been calling them nesting balls.

So, here is how I made them.


Materials:
Scissors
Crochet hook, safety pin, or large eyed needle
Yarn, ribbon, twine, rope, etc.
Potato or similar bag
Lots of fabric, yarn, and thread scraps


Step 1.  Cut the potato bag open so it makes a rectangle of "fabric." (Taking pictures was kinda an after thought, so I don't have the full bag). Cut the bag down to rectangles or squares . Mine were about 6" x 4", but play around till you find a size that works for you. 
*Quick tip: Squares will make circle balls, while rectangles will make more of a heart shape.*

Step 2. Weave a length of yarn through the holes all the way around one square of fabric. I used a crochet hook, but a safety pin or needle will work also. Really, if you are patient enough, you could probably do the weaving with just your hands. I am not. The crochet hook makes it go quickly. 

Step 3. Once you are all the way around, cut the yarn leaving a really long tail. Next, make a loop (I used a slip knot) leaving a bit of a tail. Next, slide the long tail through your loop. I suck at taking pictures of the steps. 

 Step 4. Pull the long tail so that the bag starts to tighten up a bit. 

Step 5. Start Stuffing! Keep going until you feel that you have an adequate amount of scraps in the ball. 


Step 6. Pull the long tail of yarn until the ball is all scrunched up tight. Tie a knot using the little tail from the loop. Now, wait anxiously for Spring so that you can hang these up for the birdies! 


I ran out of potato bag long before I ran out of scarps. So, out came my vinyl record bowl of leftover yarn bowls and my gigantic crochet hook (I think it's a Q), and I whipped up a few rectangles. Yeah, I probably could have just crocheted a ball...


but really, a rectangle is way quicker and I love that they look like hearts.

I hope winter is treating you well! 

Thanks for stopping by. If you have any questions at all, just let me know.


Thursday, December 8, 2011

Paint-To-Go: Watercolor Tutorial

I love pinterest. It rocks. Except when I spend, literally, hours pinning and repinning all the coolness that is out there.

I have been making a conscious effort to actually make or do some of the things that I have been pinning. I thought I would share this one with, well, anyone who might be reading :)

Today I am sharing how to make your own Paint-to-go activity sheets using liquid watercolor paints and watercolor paper. (Here is the pin that I got the idea from, and here is the website from where the pin originated.)

Materials Needed:
Watercolor paper - I used a 22"x30" sheet and cut it into 25 4x6 pieces. (about $3)
Watercolor paint- The liquid kind that comes in a tube. I bought the least expensive ones I could find (8pk for $5), next time I will splurge a bit for the more expensive ones, but only in the primary colors (we like to mix our own colors).

I decided to add black just because

Put a small dot of the desired colors somewhere on the page.  

As you can see, I do not make perfect dots. 

Allow the paint to dry. We left ours overnight. Then give them a test run. 

Just messing around with the paint. 

I was really impressed with how they worked out. We made up a bunch to give out as gifts. Emma and I also did a few more test pages. You can check that out by visiting us here

A few tips to pass along now that we have played with them a bit. 
1. Make your dots as flat as possible. Some of mine looked like little mountains, and that made some of the pieces break off. 
2. When stacking the unpainted pages together, it might be a good idea to layer in a piece of scratch paper or tissue paper between the paint and the page above it. The dry paint will leave marks. 
3. These work best with a paint brush and just a bit of water. We tried q-tips and they held too much water. 

Happy crafting!

Tuesday, April 19, 2011

Felt Flower Tutorial (tons of photos!)

I should really be doing groceries, but I would much rather be doing crafty related things :)

My crafty related thing I decided to do was create a tutorial so others can make felt flowers like I do (you know, if anyone wants to). 

Oh, and I am still getting use to this whole tutorial thing, so if you find any problems, let me know. 

Lets get started. 
Supplies
Felted wool sweaters
Scissors
Marker (or other fabric marking device)
Circle pattern (the diameter of your circle will aprox. equal your flower diameter)
Sewing Needle
Thread 
Choice of backing (pin, hair clip, headband, etc)
Hot Glue Gun (not necessary, but helpful)

Step 1. I like to make a 4 inch flower. They are a good size for pins, to go on bags, or for headbands (if you like bigger flowers on your head). Anyway,

Trace circles on your sweater. If your sweater is thicker, you will need 3 circles. For thinner felted sweaters, you will need 4 or more.
 Also, if you are making bigger flowers (bigger then 4"), you may need more circles regardless of the thickness.


Step 2. Cut all of your circles in half. 
If you have stripes on your fabric, fold your circle in half then skip ahead a few steps to figure out which way you want to cut your fabric. I like to cut across the stripes. 

If you cut out more then one set of circles, I suggest putting the correct number of 1/2 circles into individual bags. They make a great project to do on the couch or while waiting at the doctors, etc. 

3. Thread about 2 to 2.5 yards of thread onto your needle. Knot the end. 

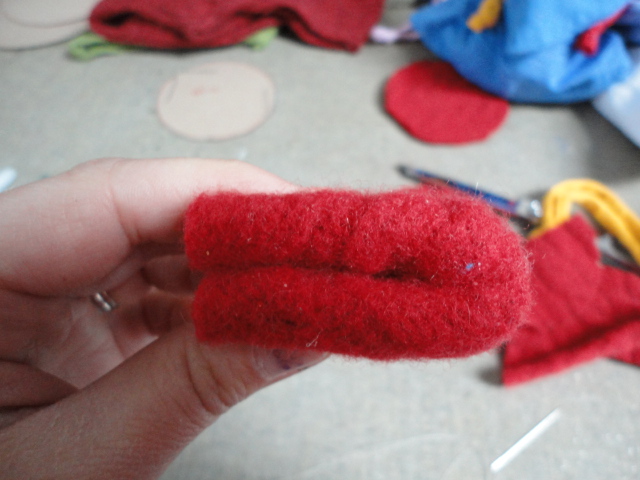
4. Take one 1/2 circle and fold it in half. 

Like this. 

Then fold one half, in half again, like the picture above. 


This is what the front will look like. 

This is what the back looks like.

Fold the other half in half, this is what the back of your flower will look like. 

And the front.

Step 5. Take your threaded needle and thread the petal right through the bottom center. 

Repeat until you have 6 petals on your thread. Be sure that when you thread each petal, the petal is facing the same direction as the others. 

Step 6. Once you have all six petals threaded, 

poke your needle through the spot where you originally inserted your needle. Instead of going straight through, insert your needle at an angle. 


Step 7. Go around the flower threading your needle through the base of the petals. Once you get back to the beginning,  

go through the first petal you started with. Pull the thread tight. Poke the needle from the front to the back.

This is what the front of your flower should look like. 

From the side. 

Step 8. Repeat step 7 on the back.  

This is what the back will look like. 


From the side after tightening both front and back. 

Step 9. To create the center, use fabric scraps from the same sweater or a different one. Cut a rectangle. 

Like this. 

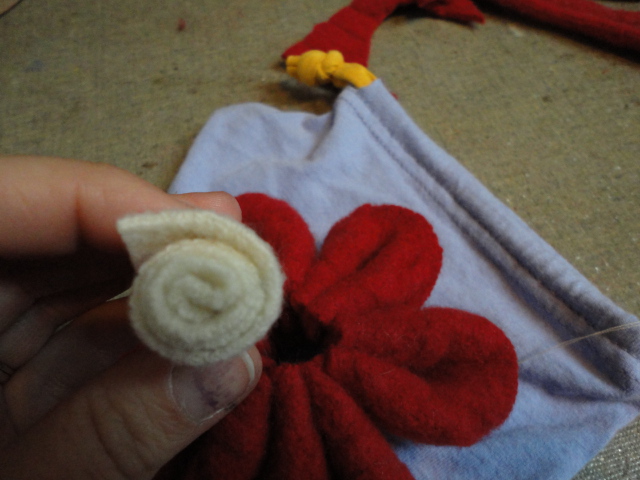
Step 10. Roll up the rectangle fabric.  

This is what you want it to look like. 

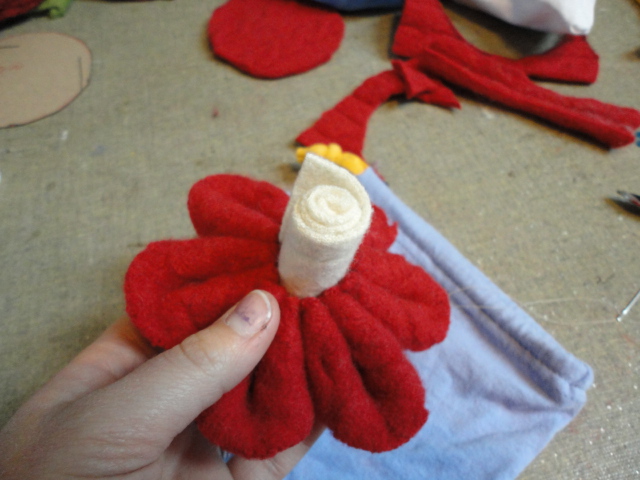
Step 11. Poke the rolled felt into the center of the flower. Twist it so that you are twisting it in the same direction that you rolled it. 

This is what it will look like once you have it where you want it. If it sticks out the back also, that is ok. You can trim it after you have finished sewing it. 

Step 12. Poke your needle back through to the front, but coming out one of the bottoms of the petal. 

poke the needle through the center of the flower, and out through the base of another petal. Keep going back and forth until you have passed the needle through base of each petal. 

This is what the front of your flower should look like. 

Step 13. Repeat step 12 on the back. 

Step 14. Trim the center of the flower in the back. Try to get it even with the petals, but make sure you don't clip any of the thread. 
  
Step 15. Cut a square of scrap fabric from the same sweater as the flower. Hot glue the scarp of fabric onto the center back of the flower. 

like this. Trim the extra edges. 

If you want your flower to be a pin, lay a strip of hot glue and firmly press the pin onto the glue. 

You want the glue to be poking through the holes, like so.

If you don't have the actual pin things, a safety pin will do just fine. Just glue the pin under a strip of scrap fabric. 

Same if you would like a flower headband. 

I apparently forgot to take some finished photos. Oops.

Oh well, I hope that you don't have any problems understanding this tutorial. 

If you do have problems or questions or comments, just let me know!

Have a great day!